Water, Love, and Wilderness

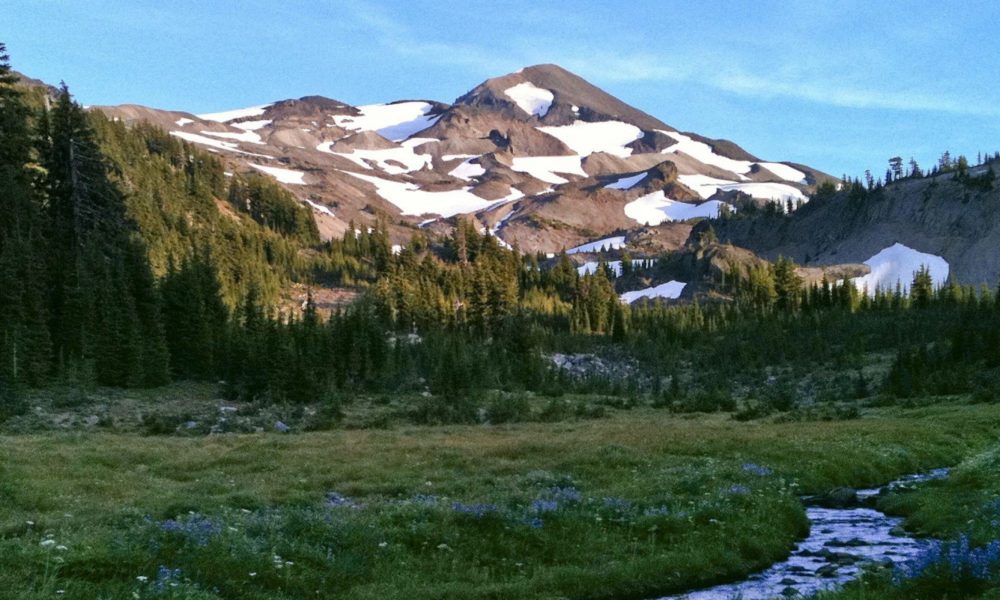
At the foot of North Sister looking Northwest

My dad always told me, “Three minutes without air, three days without water, three weeks without food.” Well, 3 hours without water in the ancient lava flows of Sisters Wilderness is both agonizing and wondrous. There were four of us: Scott, Michelle, Samantha, and Chris (me).

Scott Lake Trailhead, Hwy 242, Sisters Wilderness, Oregon

The plan, by way of government instruction, was to show up the morning of at the ranger station. The point of this, as the government-operated website told us, was to purchase overnight camping passes on a first-come-first-serve basis… Of course, passes were sold out. The individuals at the ranger station laughed, ‘Reservations are made online, up to one year in advance.’ We had to go out to the van to calm down (and conspire to just say damn the passes, and stay in the protected area anyway). The Obsidian protected area is about 3 square miles – allowing 30 day-hikers and 40 overnight visitors. We deliberated for a while on how to reapproach the trip; Do we break the rules? Or do we lay our tents down outside of the protected area, just north of Obsidian falls by about two miles. We sat in the van for some time making fun of the ranger station and creating numerous inside jokes about pretending to be a group of lost Austrians or a rag-tag stoner family with no ID or know-how when it comes to reading maps. We decided to go the legal route and head to the Scott Trailhead. Scott Trail follows the lava flows and links up with the Pacific Crest Trail just a short hike Northeast of Obsidian. Our maps showed plenty of rivers crossing the trail. Here arose trial number two: We assumed with all the river crossings that there would be water along the way. WRONG. It was the middle of summer. All river beds were dry. Even though they made no mention of this at the ranger station, we shouldn’t have made any assumption. Always know where the water is, and plan accordingly to fuel you to your next source. I certainly hope future summer backpackers in this area are properly warned by rangers, and conduct proper seasonal planning (i.e. reading this article).

Sunset from a ridge west of camp

This all brings up a third trial or in this case a lesson: Solutions to problems are all around, and very likely right in front of you. For example, being open minded to the possibility of snow in glacier country, even in summertime, can save your life. Even though glaciers are receding all over the world right now, there might be some packed snow behind some nearby trees against a shaded bank. In our case, there was some snowpack, and Sam and I cruised past it in our hurry to find a river somewhere down the trail. We pushed ahead of Scott and Michelle in order to (hopefully) find some agua at the Sawyer Bar/PCT junction but it was dry riverbed after dry riverbed. We became slightly skeptical after seeing no other hikers for the entirety of Scott Trail (of course not – there is no water!). The packs on our backs seemed heavier with every turn in the path. We took frequent stops to catch a moment in the shade, but mostly to convince each other that it’s okay to cry and that heaven will have tons of water. At this point, Sam and I were well on the Pacific Crest Trail and I was asking each passing through hiker how much further the water was. Each new answer was more maddening than the last… It was always ‘Bout point three miles’ or ‘Yeah, you got three-tenths of a mile to go.’ After definitely hiking more than one-third of a mile, we finally reached Scott Spring, where we ended up making camp. It was like we’d never experienced the luxury before in our lives. We splashed in it, dunked our faces, and kicked off our shoes and soaked our aching feet. Our first instinct was to quench our thirst and immediately head back down with full water bottles and snacks, which is what we did. Luckily, it turns out the two we left behind had the keen awareness to look for snowpack. Where we marched past valuable trail resources, they found and melted snow with camp stoves. The water they procured was enough to power them on to meet us near the junction at PCT/Scott Trail on our way back down the trail.

PCT/Scott trail Junction pink ribbon message

Lesson four: If you decide to split from your party to find water or shelter, have a plan to communicate. We used pink ribbon and varied the length to suggest our action. Short strip meant we haven’t found water and were continuing to look for it. Long strip meant we found some and are on our way back. Fortunately, Sam brought a pen and literally wrote a note of intention on the long pink ribbon. Also, once you find the glorious ice-cold spring and you feel that victory has been won. You’re ready to embark upon your rescue hike… Think again! You surely want to bring clothes that will protect you from a drop in temperature and shoes that will conduct carrying some gear or someone – in case of injury or pure exhaustion. Don’t forget headlamps!

Freeze dried meals were the cuisine of choice on the trip, along with trail mix, Clif bars, and the occasional sour gummy. Food tip: Always stir and mix your boiling water into every inch of the dehydrated food mixture before squeezing out the air and closing. If you can handle carrying it, some extra cheese goes a long way with certain meals like chili, pasta, or soup.

Many of you may know this, but binoculars are worth their weight in gold. From the bluffs surrounding our camp at Scott Spring, the glassing was spectacular. The views soar up to 100 + miles. To the Northwest you can gaze at Mount Washington, Three-Fingered Jack, Jefferson, Hood, and even Mount Adams on a clear day. To the South you can get detailed impressions of North Sister, Little Brother, and Middle Sister. From our camp, you could day hike to Lava Lake to the north, and Obsidian Falls and the protected area (as long as you don’t stay there) to the South. This a great place to jump from if you wanted to summit North or Middle Sister during your trip.The hike down took us half the time it took to venture up, including lunch, which was a delicious chicken gumbo (freeze dried).

View from camp at Scott Spring - Three Fingered Jack
View from camp at Scott Spring – Three Fingered Jack
PCT/Scott Trail Junction looking South at North Sister

Not only was I blessed just to share in the joy of the backcountry with the love of my life and her family, but she made sure we will have it for all-time, by proposing to marry me and merge our families – A fantastic lesson (and adventure) indeed. I can’t wait to go back to Scott Spring for years and years to come. Without intending it, a familial backpacking tradition was born.

Self-discipline

As the year comes to an end, now less than 12 hours left, we tend to look back. But, I’m here to tell you, it’s time to look forward, not back. Many of us will follow the tradition of making New Years resolutions, which in and of itself is not a bad thing, it is, dare I say a misused. We make commitments to lose weight, get in better shape or learn a new skill, these are all good ambitions, but are doomed to failed without the single most important ingredient, self-discipline.

So, my new years resolution is to have more self-discipline in my life! With this I will increase my chances of attaining any goal I set. Which takes me to goals, now that I am resolute in being more disciplined, I can set some goals, all of which will benefit from self-discipline.

I won’t bore you with my personal goals, because they are just that, personal. As all of yours should be too. Set goals that are personal and growth oriented, make them attainable. If you have lofty goals, break them into smaller chunks, set yourself up for success, not failure. You will have enough of that, it a part of the journey to success.

Set goals to be stronger, healthier and more prepared for the challenges ahead. But, resolve yourself to have more self-discipline, it will make your path to attaining your goals more fruitful.

As Always,

Stay Vigilant and Be Prepared

Winter camping – where to go and how to get there

OK, Thanksgiving is past, I hope y’all had good times with family and friends. Back to the matter at hand. Winter camping in all it’s splendor, and how to make it the most enjoyable and survivable. If winter camping is something you already enjoy, I hope you find at least a few tidbits of information learned through my experiences and/or failures.

ski-adventure-through-the-tien-shan-celestial-mountains2__880We have talked about clothing, shelter, water, food and food preparation so at this point you should be just about ready to get out there and give it a whirl. So let’s talk about the different ways you can get to where you want to be and how to elect your first destination.

The first time you go out in the winter, no matter how much you read or how well you prepare, you will learn something new. When selecting your first destination keep this in mind. You will be testing your gear and your resolve for the first time, make it somewhere easy to get in and out of, don’t over commit. You need to make sure you can get out safely should you experience distress or a catastrophic failure. Be safe, not sorry!

Now how do we get there? You have several options, one of which I prefer. Fresh snow is imagesthe best experience so I tend to base my biases on that. My preferred method of transportation in the winter wilderness is snowshoeing, there are other options e.g. cross country skis, Telemark or snowmobiles, etc. But I find the most cathartic experience comes from embracing the journey, it’s not a race to a destination, it’s an experience best viewed at a slow methodical pace.

2aa8a838-e0d2-4c54-a1cc-b6aa0a4ec414_1000Remember I mentioned that weight in the winter was not as important as it was in the summer? Here is why, in the winter, when you travel by snowshoe you can carry a large portion of your supplies on a sled, this reduces the load on your back and your snowshoes. A simple runner-less plastic sled is perfect for this application. Simply run two lines to the waist belt of the person if front and behind. Lines to the person behind keep the sled on track when you hit sloped areas without the need for rigid attachment poles. And I strongly recommend you travel with at least two people in your group, remember safety first.

There is so much more to talk about on this subject, I expect that you will do more research.


As Always,

Stay Vigilant and Be Prepared


Happy Thanksgiving

May you find yourselves surrounded by familiar faces, with your feet warm and a table filled with your favorite foods.

img_20160801_154325045_hdrLately the world has been filled with angst, anger and unrest and unfortunately most of it is understandable. So I ask everyone to set aside these feelings for one day and embrace those you love, fill their hearts with song and laughter, bring joy to all you touch today.

Most of all spend this day with love and grace in your heart and spread it around.

Peace and Love to all!

As Always,

Stay Vigilant and Be Prepared

Winter camping in the wild

Now that we have our attire all sorted out, well at least if you read my last post, lets examine what you will need to survive out there for a few nights or longer. First let me say that this is not something you should be trying if you don’t already know how to live out in the wild during the summer, most of the skill-sets and equipment are similar and I will only be addressing the differences.

Snow camping in the Northwest
My trusty igloo

Shelter is very high on the list of importance, remember the rule of three’s? I am going to assume you can breathe, so this is actually at the top of the list and is a little bit different than your summer tent. It needs to be load rated, meaning it needs to be able to withstand significant snowfall without collapsing. It needs to have a full fly, one that goes all the way to the ground, all the way around. It will preferably have a significant vestibule (a small shelter area under the fly and outside of the tent) so you can control what weather gets in your tent and possibly cook (the vestibule must be designed for cooking in) if necessary. The weather can turn bad quickly, so you need to be ready to function comfortably when it does.

Winter watering hole

Water is not a given out in the winter wonderland, it is often quite hard to find in its liquid state. Here are a few hard learned tips to get some fresh ice-cold water. The first one is easy, if you can pick a spot by a creek or river, with an approachable bank, remember you don’t want to get wet!, you will always have water at the ready. If you are camping by a lake, chances are it will be frozen over, the easiest way to get at the water is to find a boulder that is half in and half out of the lake and gets the full sun. The ice around the boulder will be easier to chip through. A tree that has roots that run into the lake is also a good spot. The ice is also softer underneath a snow drift, oddly enough. Most of all remember whatever water you have will freeze over time, so you will probably never wake up having drinkable water. In a pinch you can always melt snow, but this is very costly fuel wise and will cut your trip short if you didn’t plan the fuel for it.

In the kitchen
In the kitchen

Food is the most satisfying of all, you would not believe how awesome Mountain House Chili Mac is when you are kicked back in your custom fitted lazy boy, made of snow, watching the sun set at 4:30pm and it’s 17 degrees out. I tell you it’s pretty darn good. You’ll also want to bring your 2 or 3 favorite hot beverages, I like to bring coffee, hot chocolate, hot apple cider and a couple of tea bags. I use a steel cup, a steel bowl and a steel plate, weight isn’t as much of an issue in the winter, but we’ll talk about that later. As far as food goes, I tend to eat like I’ve been starved for a week when I’m out in the winter, I guess that what they mean by comfort food. Brings lots of carbs and saucy stuff, or whatever makes you happy, as long as you bring plenty. Power bars are going to be skipping stones, so leaves those at home unless you want to carry them around in your underwear (the only way I found to get them soft enough to eat), in the wrapper, of course. Always think about how any ready to eat food item will be at 25 degrees, even brownies are hard to eat at that temperature. Plan to eat mostly hot meals, you’ll want to anyway, trust me.

Food Preparation a.k.a. your stove, most of the modern stoves out there are using a butane mix of some sort, you will find this works well in the cold. If you use a wood burning

Get out there
Get out there

stove, consider renting a butane stove, your life will be much easier. Natural fuel in the winter wild is a rare commodity and should be considered a means of survival, not a primary means of cooking. I always carry a tab stove with me to use as a backup should my primary fail. Now here’s a little trick I use to cook on 5 feet of snow, I carry a couple of cedar shingles, they make great little tables for your stove or your hot cup of coffee (these disappear quickly if you set them on the snow) and they are great for an emergency. You can buy pre-made closed cell foam stove holders, but what’s the fun in that. What ever you choose to do, be sure you have something to put your stove on when cooking and something to put your hot beverages on and get out there.

As Always,

Stay Vigilant and Be Prepared

Staying warm in the wild

Staying warm in the wild isn’t as difficult as most believe. That’s not to say that it is easy

Winter wonderland
Winter wonderland

and should be done without some thought and planning. It is just a matter of understanding the forces at work and how to use them to your benefit.

There are 4 primary ways your body loses heat; Evaporation, Radiation, Convection, Conduction. Let’s examine each of these.

  1. Evaporation of water from your skin if it is wet (sweating). If your clothing is wet, you will also lose some body heat through evaporation, and through respiration (breathing) when the body temperature is higher than 99°F (37°C). During intense exercise, the body loses 85% of its heat through sweating.
  2. Radiation (similar to heat leaving a light bulb). This normal process of heat moving away from the body usually occurs in air temperatures lower than 68°F (20°C). The body loses 65% of its heat through radiation.
  3. Convection (this is how a fan cools you, by pulling the heat from you with the air, like wind). The body loses 10% to 15% of its heat through convection.
  4. Conduction (such as heat loss from sleeping on the cold ground). Heat is lost in air temperatures lower than 68°F (20°C). The body loses about 2% of its heat through air conduction. However, water causes more heat loss from the body than air does, so heat will be lost from the body very quickly when it is in cold water.
The air is sooo cold

Now that we have identified the four primary causes of heat loss from our bodies, we can prepare ourselves to control each one. This is where the practice of dressing in layers comes from. We choose the material and fit of each layer to provide protection from each of the four enemies to our body heat.

  1. Base layer (the one right next to your skin), this layer should be a snug fit, not tight just snug. Moisture management is the job of this layer, it needs to be made of a nonabsorbent wicking material, that moves the moisture away from your skin. Like, polyesters such as Power Dry or Capilene or merino wool, NEVER cotton.
  2. Middle layer, this is your insulation layer, I like to have it loose fitting, not baggy, just nonrestrictive. Wool and goose down are fantastic natural insulators. Wool keeps you warm no matter what, while goose down is the most efficient insulator, it is worthless if it gets wet. My Middle layer of choice is a dark-colored, mid-weight, wind-proof fleece, it dries faster than wool and works when wet. It also keeps the biting wind at bay when you take your shell off.
  3. Shell layer, this is your protection from the wind, rain and snow. Your shell is your first line of defense, it needs to be waterproof and windproof yet breathable to allow perspiration to escape, you don’t want to freeze in your own sweat. Make sure it is big enough to accommodate your base and middle layers worn together. I prefer one without insulation, with a hood, it is just more versatile out in the wild. Don’t skimp on this one, it is not fun being wet out in the woods, even if you are warm.

You need to do this for both top and bottom, your lower half represents 30-33% of your body mass.

Up on the ridge
Up on the ridge

Now we just need to apply the layers judiciously. You will always have your base layer on. If

you are involved in strenuous activity, you will want to remove your middle layer, maybe even your shell top. Just be sure to put them back on when you stop, you want to keep most of the heat you just generated.

When I am out in the winter wonderland I spend most of the time at camp with all three layers on the bottom (I spend a lot of time sitting in the snow) and my base and middle layers on top. this usually keeps me warm enough. You will find your own comfort zone.

Last but not least, we need to take care of out extremities. Head, hands and feet.

  1. Head, I spend a lot of time without head-gear, I just run hot. But, I always carry these two things. A Ear-band (a headband designed to cover your ears) and a fleece hat. Combined with the hood on my shell, they have my covered.
  2. Hands, I recommend all three layers for these guys. Get yourself a good pair of silk glove liners, worth their weight in gold, not only do they keep your digits toasty, they are fire-proof. A good pair of fleece mittens with matching shells. When you keep all your digits together they are warmer. But, gloves are good too.
  3. Feet, These are your most valuable assets, they got you here and they’ll get you out, if you take care of them. Silk sock liners are my personal favorite, but merino wool and polyester work too. Just make sure they fit well, you don’t want these bunching up. Nice mid-weight over the calf boot socks, these work great to join your sock liners with your lower base layer, cozy. A good pair of boots will be your best friend, no one is happier than the person with toasty toes.
I'm home - NW Survival founder
I’m home – NW Survival founder

Well, there is my seven cents, based on my own personal experience. I have not yet spent a cold miserable night in the wilderness while following these principles. Your greatest tool is your mind. Study these concepts and prepare yourself for the journey, gear doesn’t save your life if you don’t know how to use it. Your body generates all the heat it will ever need. All you need to do, is manage how you lose it, and keep it to a minimum.

I once put a water bottle in my sleeping bag with me, so I would have water in the morning for drinking and coffee, It froze solid overnight. The lesson here, I generate my own heat, so I was never cold. The water bottle however does not, so it froze solid.

As Always,

Stay Vigilant and Be Prepared


Winter is coming

Winter is almost here, and it brings with it the miserable wet, not quite cold enough for

Mt Washington looking over Big lake all covered in snow

snow, weather to the valleys of the Northwest. But, it also brings the dry powdery snow to the highlands and eastern portions of the Northwest. I love this time of year for the sporting opportunities it brings, Skiing, Snowboarding, Cross-country skiing and Snow shoeing.

It can also be the best time to go camping, snow camping that is. Two of my favorite reasons to go snow camping are, no bugs and no dirt, but my favorite is the night sky, if you have never been deep in the wilderness on a cold winters night with a clear sky, you are missing out. It is the most brilliant spectacle of Snow camping in the Northwestall the stars you will ever see while on earth. I once snow shoed 4 miles at 3am, with no artificial light, the stars were so bright.

This time of year also brings different challenges to our survival while out in the wilderness. It is exponentially more difficult to start a fire, let alone keep it burning, fuel is a rare commodity where the snow is five feet deep. Finding water where all the lakes and ponds are frozen over and creeks are nearly impossible to safely approach because the snow banks are so deep and the last thing you want to do is get wet.

We need to prepare a little differently, we need to think about things like where will I put

I'm home - NW Survival founder

my stove when I’m trying to cook or boil water? Will the fuel I use work at this temperature, or will there be fuel available? How will I stay warm when I can’t build a fire?

Over the next few weeks we will be talking about all these things, stay tuned!

As Always,

Stay Vigilant and Be Prepared

October Storm 2016

OK all you North Westerners, the storm of the decade is headed our way. This is the remnants of a typhoon and has the potential to be stronger that the Columbus day storm of 1962. For all of you too young to know what that means, I will post some news articles. Put everything outside away. Get your Emergency readiness kits handy. You could have an extended power outage. Hunker down and stay put.

A basic emergency supply kit could include the following recommended items:

  • Water, one gallon of water per person per day for at least three days, for drinking and sanitation
  • Food, at least a three-day supply of non-perishable food
  • Battery-powered or hand crank radio and a NOAA Weather Radio with tone alert and extra batteries for both
  • Flashlight and extra batteries
  • First aid kit
  • Whistle to signal for help
  • Dust mask to help filter contaminated air and plastic sheeting and duct tape to shelter-in-place
  • Moist towelettes, garbage bags and plastic ties for personal sanitation
  • Wrench or pliers to turn off utilities
  • Manual can opener for food
  • Local maps
  • Cell phone with chargers, inverter or solar charger

Columbus Day Storm 1962

Columbus Day Storm videos

As always,

Stay Vigilant and Be Prepared

Vigilance

We couldn’t say it better than Professor Paul Markel of SOTG (Student of the Gun)

https://youtube.com/watch?v=Dxx733nb70U%3Fmodestbranding%3D1%26autohide%3D1

Here are links the rest of the series: Video #1Video #3

As always,

Stay Vigilant and Be Prepared

×